Adding JDBC Driver to Load Tester (multiple remote servers) Powered by Apache JMeter™
How to add the JDBC Driver to the Load Tester (multiple remote servers) Powered by Apache JMeter™

Load Tester (multiple remote servers) Powered by Apache JMeter™ is an Apache JMeter™ running on multiple servers on Microsoft Azure that can be used for large-scale load testing.
When performing a load test against a data source that requires the JDBC Driver, which is not included by default in JMeter, the JDBC Driver file must be distributed to all JMeter servers.
However, when you have a large number of JMeter servers, setting up the JDBC Driver on all of them is a tedious tasks.
Load Tester (multiple remote servers) Powered by Apache JMeter™ provides an easy way to make it happen.
Outline of steps
- Get JDBC Driver
- Copy the JDBC Driver file to the network disk
- Configure user.classpath in the jmeter.properties file for the JMeter server
- Restart all JMeter servers
Details of steps
In this article, install JDBC Driver for Microsoft SQL Server and test it against Azure SQL Database.
- Get JDBC Driver
Login to the JMeter Client by remote desktop and download the latest JDBC Driver from the following page using a web browser.
https://docs.microsoft.com/en-us/sql/connect/jdbc/download-microsoft-jdbc-driver-for-sql-server?view=sql-server-ver15
Alternatively, you can also download it by running the following command in the console.
(As of Aug. 10, 2020)$ curl -L https://go.microsoft.com/fwlink/?linkid=2137600 -o sqljdbc.zip - Copy the JDBC Driver file to the network disk
Network disks are mounted in /mnt/systmp and /mnt/jmuserdata on the client and servers.
Create a directory for the JDBC Driver file for the server in one of these directories and copy the JDBC Driver file to it.$ mkdir /mnt/systmp/lib $ unzip {Downloaded file.zip} $ cp sqljdbc_{VERSION}\\enu/mssql-jdbc-{VERSION}.jre8.jar /mnt/systmp/libAs JMeter in the Load Tester uses Java 8, copy the corresponding file (*.jre8.jar).
See here for instructions on how to change the version of Java used by the Load Tester. - Configure user.classpath in the jmeter.properties file for the JMeter server
The jmeter.properties file for the JMeter servers can be reflected on the servers by editing the /mnt/systmp/jmeter.properties file from the client.
Find “user.classpath” in the file and set the directory where you placed the JDBC Driver file in the previous step as follows.# List of directories that JMeter will search for utility and plugin dependency classes. # Use your platform path separator to separate multiple paths. # Any jar file in such a directory will be automatically included, # jar files in sub directories are ignored. # The given value is in addition to any jars found in the lib directory. # All entries will be added to the class path of the system class loader # and also to the path of the JMeter internal loader. # Paths with spaces may cause problems for the JVM user.classpath=/mnt/systmp/lib - Restart all JMeter servers
Restart the virtual machine scale set of JMeter servers in Azure Portal.
Virtual machine scale set of JMeter servers is created with the name you specified as the virtual machine scale set name for the JMeter Servers when you deployed the Load Tester.
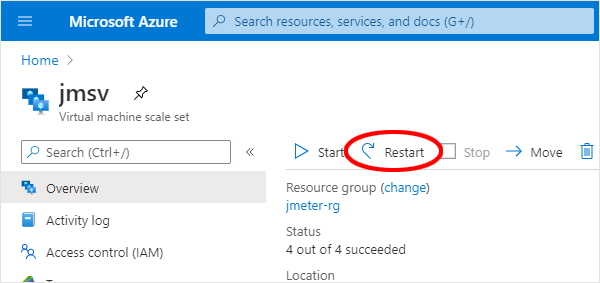
This will restart all of the JMeter servers and make the JDBC Driver available.
Operation check
Let’s test it in JMeter against the Azure SQL Database.
- Launch JMeter
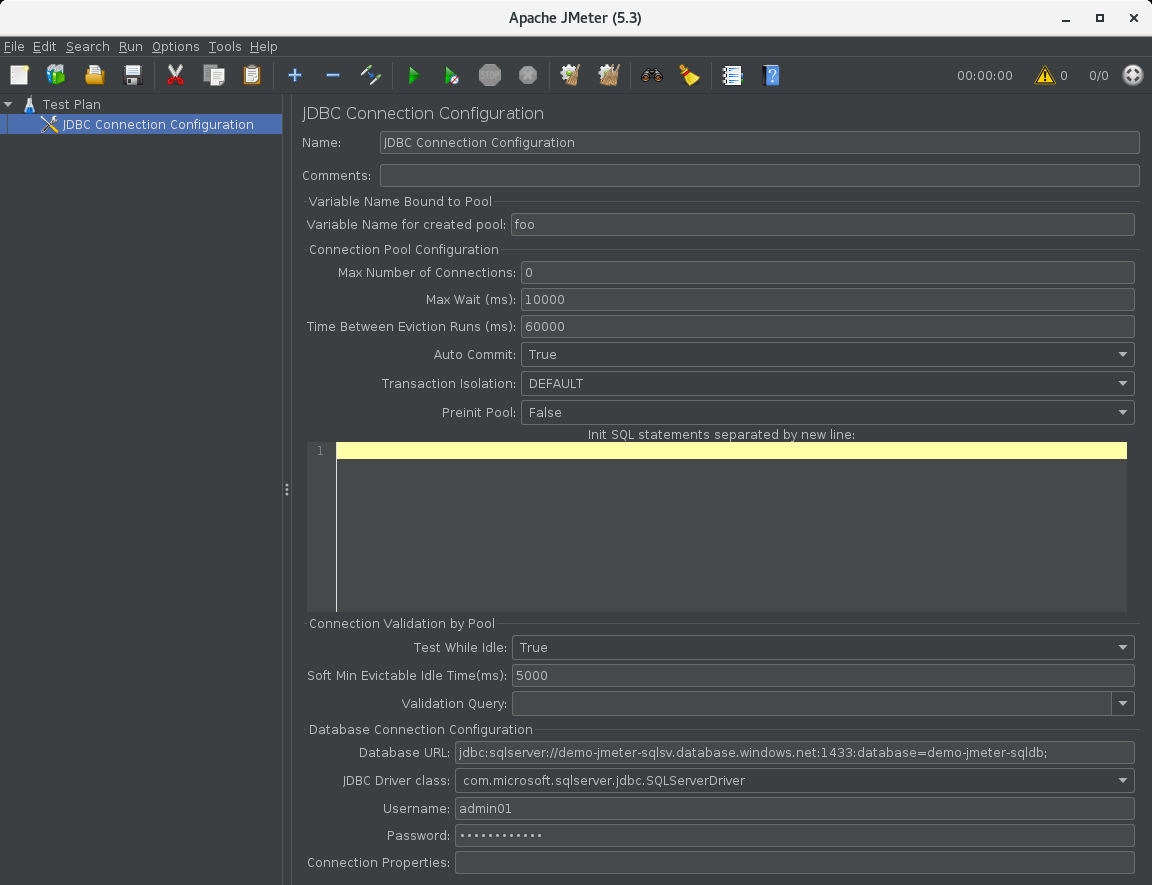
- Add a “JDBC Connection Configuration” to the Test Plan and configure it
Add > Config Element > JDBC Connection Configuration
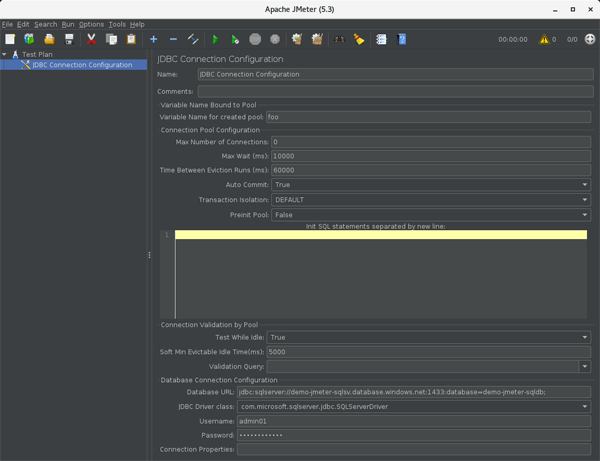
- Variable Name Bound to Pool
- Variable Name for created pool: Identification name specified by the JDBC Request Sampler
- Database Connection Configuration
- Database URL: Connection string (server name and database name)
e.g.)jdbc:sqlserver://SERVERNAME.database.windows.net:1433;database=DBNAME; - JDBC Driver class: “com.microsoft.sqlserver.jdbc.SQLServerDriver”
- Username: The user name to connect to
- Password: Password for the user to connect
- Database URL: Connection string (server name and database name)
- Variable Name Bound to Pool
- Add “Thread Group” to the Test Plan
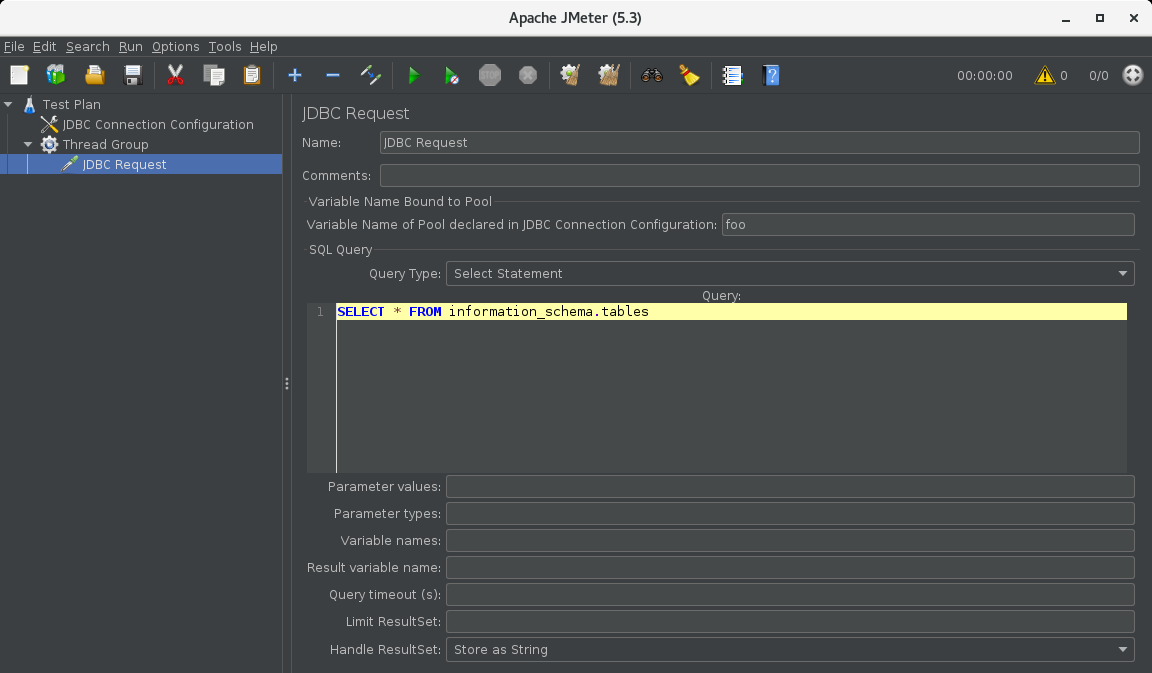
Add > Threads > Thread Group - Add a “JDBC Request” sampler to the Thread Group and configure it
Add > Sampler > JDBC Request
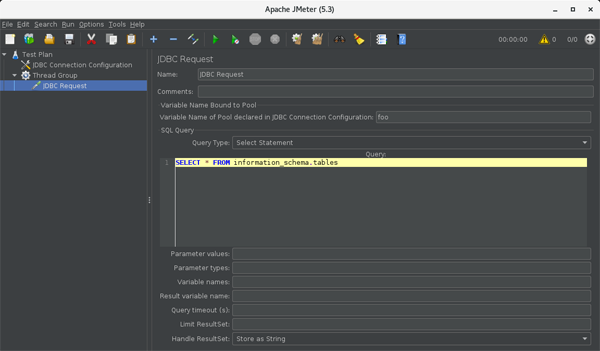
- Variable Name Bound to Pool
- Variable Name of Pool declared in JDBC Connection Configuraion:
The value set to “Variable Name Bound to Pool” in the previous JDBC Connection Configuration.
- Variable Name of Pool declared in JDBC Connection Configuraion:
- SQL Query: SQL statement to execute.
- Variable Name Bound to Pool
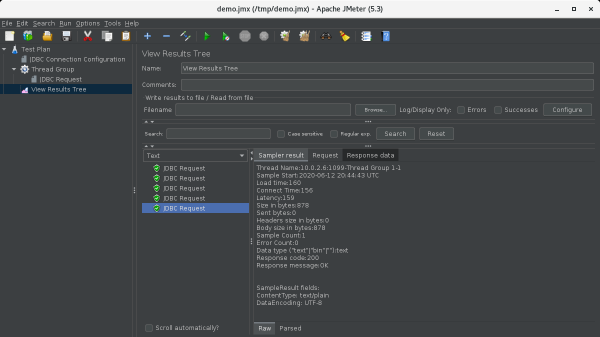
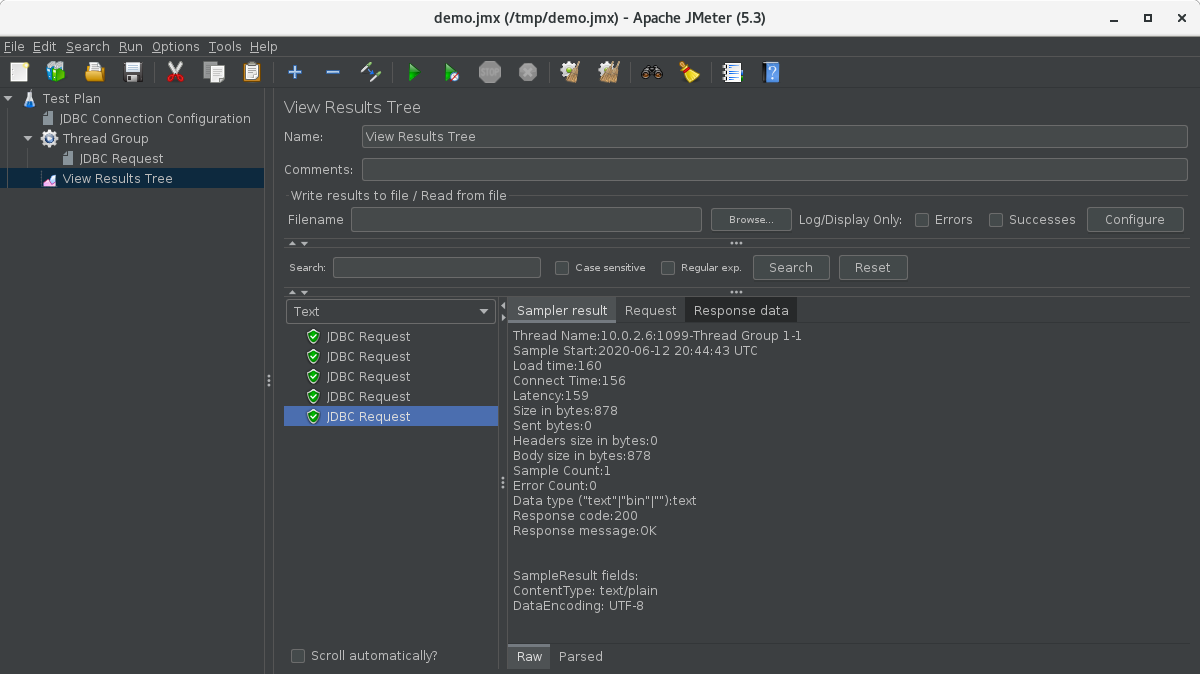
- Add an appropriate listener to the Test Plan or the same Thread Group as JDBC Request sampler
This time, we will add a “View Results Tree” to confirm that it works.
Add > Listener > View Results Tree - Run test
MENU > Run > Remote Start All - Check the results
Select the Sampler result of the appropriate JDBC Request in the View Results Tree, and if the response message is “OK”, the request by the test is successful.
If the request is unsuccessful, the following procedure may be able to determine the cause of the problem.
- Browse the Log Viewer
- MENU > Options > Log Viewer
- Determine the cause of the failure from the information output in the log viewer displayed in the lower right corner of the window, such as Exceptions.
- Run tests with just the JMeter client
- Deploying JDBC Driver file to JMeter Client
Copy the JDBC Driver file to /usr/local/jmeter/lib.$ cp sqljdbc_\{VERSION\}\\enu/mssql-jdbc-\{VERSION\}.jre8.jar /usr/local/jmeter/lib/ - Start or restart JMeter on the client
- MENU > Run > Start
- Investigate the cause of the problem from the “Response data” of a JDBC Request that is an error in the View Results Tree
- Deploying JDBC Driver file to JMeter Client
- Change it to allow remote testing to get response data as well, If the client-only test doesn’t produce an error
- Set mode to Standard in the jmeter.properties file (/usr/local/jmeter/bin/jmeter.properties) on the client.
# Remote batching support # Since JMeter 2.9, default is MODE_STRIPPED_BATCH, which returns samples in # batch mode (every 100 samples or every minute by default) # Note also that MODE_STRIPPED_BATCH strips response data from SampleResult, so if you need it change to # another mode # Batch returns samples in batches # Statistical returns sample summary statistics # mode can also be the class name of an implementation of org.apache.jmeter.samplers.SampleSender mode=Standard - Start or restart JMeter on the client
- Run the test with “Remote Start All” and investigate the cause of the problem from the “Response data” of a JDBC Request that is an error in the View Results Tree.
Be sure to restore the mode setting in the jmeter.properties file once you’ve solved the problem.
- Set mode to Standard in the jmeter.properties file (/usr/local/jmeter/bin/jmeter.properties) on the client.
JMeter Plugins can be implemented in the same way.
I’ll be writing about that detailed procedure in the future.