Load Tester (multiple remote servers) Powered by Apache JMeter™にJMeter Pluginsをセットアップする
Load Tester (multiple remote servers) Powered by Apache JMeter™にJMeter Pluginsをセットアップする方法を説明します

Load Tester (multiple remote servers) Powered by Apache JMeter™は、Apache JMeter™をMicrosoft Azure上の複数のサーバーで稼働させ、大規模な負荷テストができるものです。
JMeter標準では提供されていないSamplerやListenerなどはJMeter Pluginにより拡張することができます。
Samplerを中心としたいくつかのJMeter Pluginは、そのプラグインの利用に必要なライブラリファイルをすべてのJMeterサーバーに配布する必要があります。 しかし、多数のJMeterサーバーを用意した場合、そのすべてにプラグインをセットアップすることは面倒な作業です。
Load Tester (multiple remote servers) Powered by Apache JMeter™では、それを簡単に実現する方法が用意されています。
※ 対応できないプラグインもあります。
手順概要
- JMeter Plugins Managerを取得
- JMeterクライアントにJMeter Plugins Managerを導入する
- 既に導入されているライブラリファイルを確認する
- JMeterクライアントにプラグインを導入する
- プラグインの導入により追加されたライブラリファイルを確認する
- JMeterサーバーのプラグイン用ディレクトリをネットワークディスクに作成し、プラグラインのライブラリファイルをコピーする
- JMeterサーバー用のjmeter.propertiesファイルでsearch_pathsとplugin_dependency_pathsを設定する
- すべてのJMeterサーバーを一括再起動する
手順詳細
今回は、JMeter Plugins Managerでインストールできる"SSH Protocol Support“プラグインをセットアップしSSH Samplerを利用できるようにします。
-
JMeter Plugins Managerを導入する
JMeterクライアントにリモートデスクトップでログインし、Webブラウザを利用して以下のページから最新のPlugins Managerをダウンロードします。
https://jmeter-plugins.org/install/Install/
コンソールで以下のようなコマンドを実行することでもダウンロードすることができます。$ wget -O jmeter-plugins-manager.jar https://jmeter-plugins.org/get/ -
JMeterクライアントにJMeter Plugins Managerを導入する
先ほどダウンロードしたJMeter Plugins Managerのjarファイルを /usr/local/jmeter/lib/ext にコピーします。$ cp jmeter-plugins-manager.jar /usr/local/jmeter/lib/ext -
既に導入されているライブラリファイルを確認する
Plugin Managerによって今後の処理でインストールされたファイルを判断できるようにするために、現在のライブラリファイル一覧を記録します。$ ls -d $(find /usr/local/jmeter/lib -type f) > jmeter-libs-before.txt -
JMeterクライアントにプラグインを導入する
- JMeterを起動する
- メニューの Options (オプション) > Plugins Manager から"JMeter Plugins Manager” を表示する
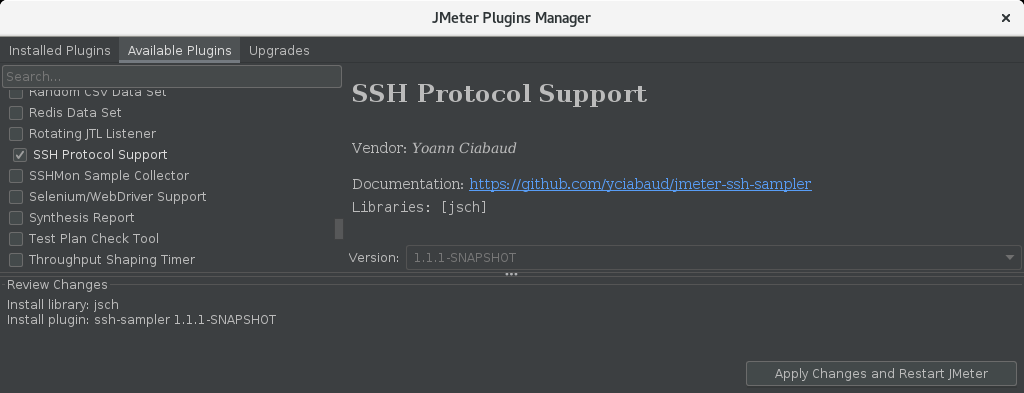
- Available Pluginsタブで “SSH Protocol Support” を選択する
 Review Changesに “install library: jsch”, “install plugin: ssh-sampler 1.1.1-SNAPSHOT” などが表示されます。
 - [Apply Changes and Restart JMeter]をクリックする
JMeterが再起動されます。
-
プラグインの導入により追加されたライブラリファイルを確認する
以下のコマンドにより、追加されたライブラリファイルを見つけます。$ ls -d $(find /usr/local/jmeter/lib -type f) > jmeter-libs-after.txt $ diff jmeter-libs-before.txt jmeter-libs-after.txt 46a47 > /usr/local/jmeter/lib/ext/ApacheJMeter_ssh-1.1.1-SNAPSHOT.jar 81a83 > /usr/local/jmeter/lib/jsch-0.1.50.jarここでは、“lib/ext/ApacheJMeter_ssh-1.1.1-SNAPSHOT.jar” と “lib/jsch-0.1.50.jar” が追加されたことがわかります。
“lib/json-lib-2.4-jdk15.jar” なども表示されるかもしれません。
このファイルはJMeter Plugins Managerのセットアップにより追加されるファイルで、SSH Protocol Supportには不要です。 -
JMeterサーバーのプラグイン用ディレクトリをネットワークディスクに作成し、プラグラインのライブラリファイルをコピーする
クライアントおよびサーバーの /mnt/systmp および /mnt/jmuserdata にネットワークディスクがマウントされています。
このいずれかに、プラグインのライブラリファイルを配置するためのディレクトリを作成し、そこに追加されたファイルをコピーします。mkdir -p /mnt/systmp/lib/ext cp /usr/local/jmeter/lib/ext/ApacheJMeter_ssh-1.1.1-SNAPSHOT.jar /mnt/systmp/lib/ext cp /usr/local/jmeter/lib/jsch-0.1.50.jar /mnt/systmp/lib -
JMeterサーバー用のjmeter.propertiesファイルでsearch_pathsとplugin_dependency_pathsを設定する
JMeterサーバー用のjmeter.propertiesファイルは、クライアントから /mnt/systmp/jmeter.properties ファイルを編集することでサーバーに反映することができます。
ファイル内から “search_paths” と “plugin_dependency_paths” を探し出し、以下のように前の手順でjarファイルを配置したディレクトリを設定します。# List of directories (separated by ;) to search for additional JMeter plugin classes, # for example new GUI elements and samplers. # Any jar file in such a directory will be automatically included, # jar files in sub directories are ignored. # The given value is in addition to any jars found in the lib/ext directory. # Do not use this for utility or plugin dependency jars. search_paths=/mnt/systmp/lib/ext # ...中略... # List of directories (separated by ;) that JMeter will search for utility # and plugin dependency classes. # Any jar file in such a directory will be automatically included, # jar files in sub directories are ignored. # The given value is in addition to any jars found in the lib directory # or given by the user.classpath property. # All entries will be added to the path of the JMeter internal loader only. # For plugin dependencies this property should be used instead of user.classpath. plugin_dependency_paths=/mnt/systmp/lib -
すべてのJMeterサーバーを一括再起動する
Azure PortalでJMeterサーバーの仮想マシンのスケールセットを再起動します。
JMeterサーバーの仮想マシンのスケールセットは、Load Testerの導入時にJMeter ServersのVirtual machine scale set nameとして指定した名前で作られています。
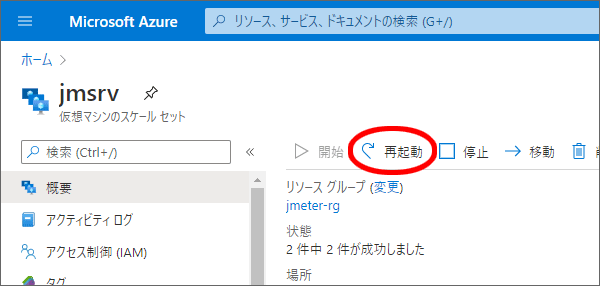
これにより、すべてのJMeterサーバーが一括で再起動され、プラグインが利用可能になります。
動作確認
それではJMeterでSSHサーバーに対してテストをしてみましょう。
-
JMeterを起動する
-
Test Planに"Thread Group"を追加する
Add (追加) > Threads (Users) > Thread Group (スレッドグループ) -
追加したThread Groupに"SSH Command"サンプラーを追加し設定する
Add (追加) > Sampler (サンプラー) > SSH Command
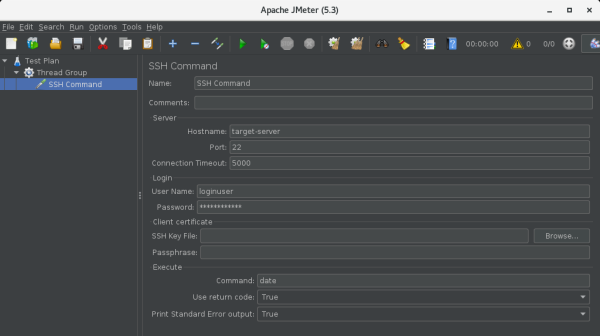
- Server
- Hostname: 接続先ホスト名
- Login
- User Name: ログインユーザー名
- Password または Client certificate: 接続するユーザーのパスワードまたはクライアント証明書情報
- Execute
- Command: テスト実行するコマンド
- Server
-
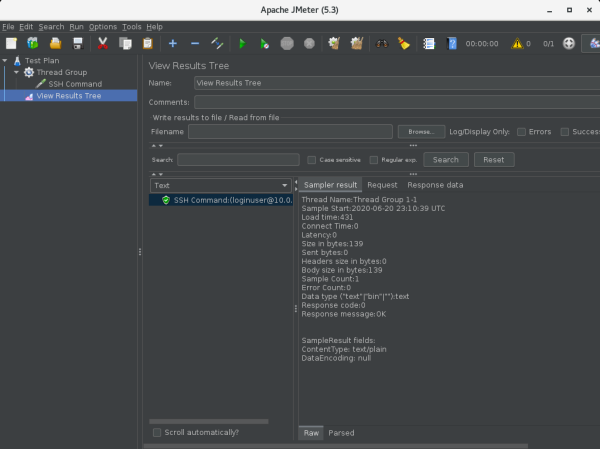
Test Planあるいは同じThread Groupに適当なリスナーを追加する
ここでは動作確認のために"View Results Tree"を追加します。
Add (追加) > Listener (リスナー) > View Results Tree (結果をツリーで表示) -
テストを実行する
メニューの Run (実行) > Remote Start All (全て開始(リモート)) -
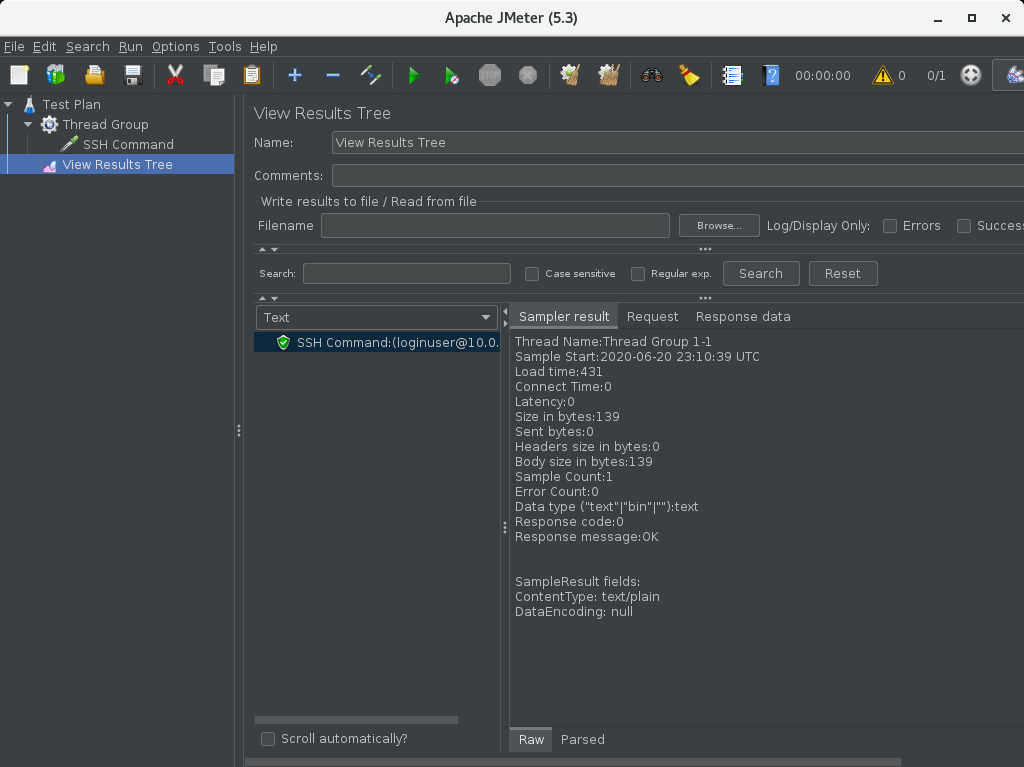
結果を確認する
View Results Treeで適当なSSH CommandのSampler resultを選択し、Response messageが"OK"であればテストによるリクエストが成功しています。

リクエストが成功しない場合は、以下の手順で切り分けができるかもしれません。
-
ログビューアを参照する
- メニューの Options (オプション) > Log Viewer
- ウィンドウ右下に表示されるログビューアに出力されたExceptionなどの情報から判断する
-
クライアントだけでテストを実行する
- メニューから Run (実行) > Start (開始)
- View Results TreeのエラーになっているSSH Commandの"Response data"から問題を判断する
-
クライアントだけでのテストではエラーにならない場合は、リモートテストでもResponse dataが取得できるようにする
- クライアントの設定ファイル (/usr/local/jmeter/bin/jmeter.properties) でmodeをStandardにする
# Remote batching support # Since JMeter 2.9, default is MODE_STRIPPED_BATCH, which returns samples in # batch mode (every 100 samples or every minute by default) # Note also that MODE_STRIPPED_BATCH strips response data from SampleResult, so if you need it change to # another mode # Batch returns samples in batches # Statistical returns sample summary statistics # mode can also be the class name of an implementation of org.apache.jmeter.samplers.SampleSender mode=Standard - クライアントのJMeterを起動あるいは再起動する
- “Remote Start All (すべて開始(リモート))“でテストを実行し、View Results TreeのエラーになっているSSH Commandの"Response data"から問題を判断する
解決したら、jmeter.propertiesファイルのmode設定を元に戻すことを忘れないように注意してください
- クライアントの設定ファイル (/usr/local/jmeter/bin/jmeter.properties) でmodeをStandardにする